Automation scripts are undoubtedly a powerful feature but we all know there are some limitations. For example automation scripts cannot be used to handle user input in a custom dialog box. This is because the scripting engine runs in the businessobjects layer which is below the maximouiweb layer that can handle DataBeans and user interface events.
However, leveraging the standard Maximo event, it is possible to circumvent this limitation.
In this post I will explain how to display a custom dialog in the Work Order Tracking application to ask for user input and launch a script to take an action when the user press the OK button.
In the example below I have built an improved version of the ‘Create Work Order’ action that creates a follow’up work order from the Work Order Tracking application.
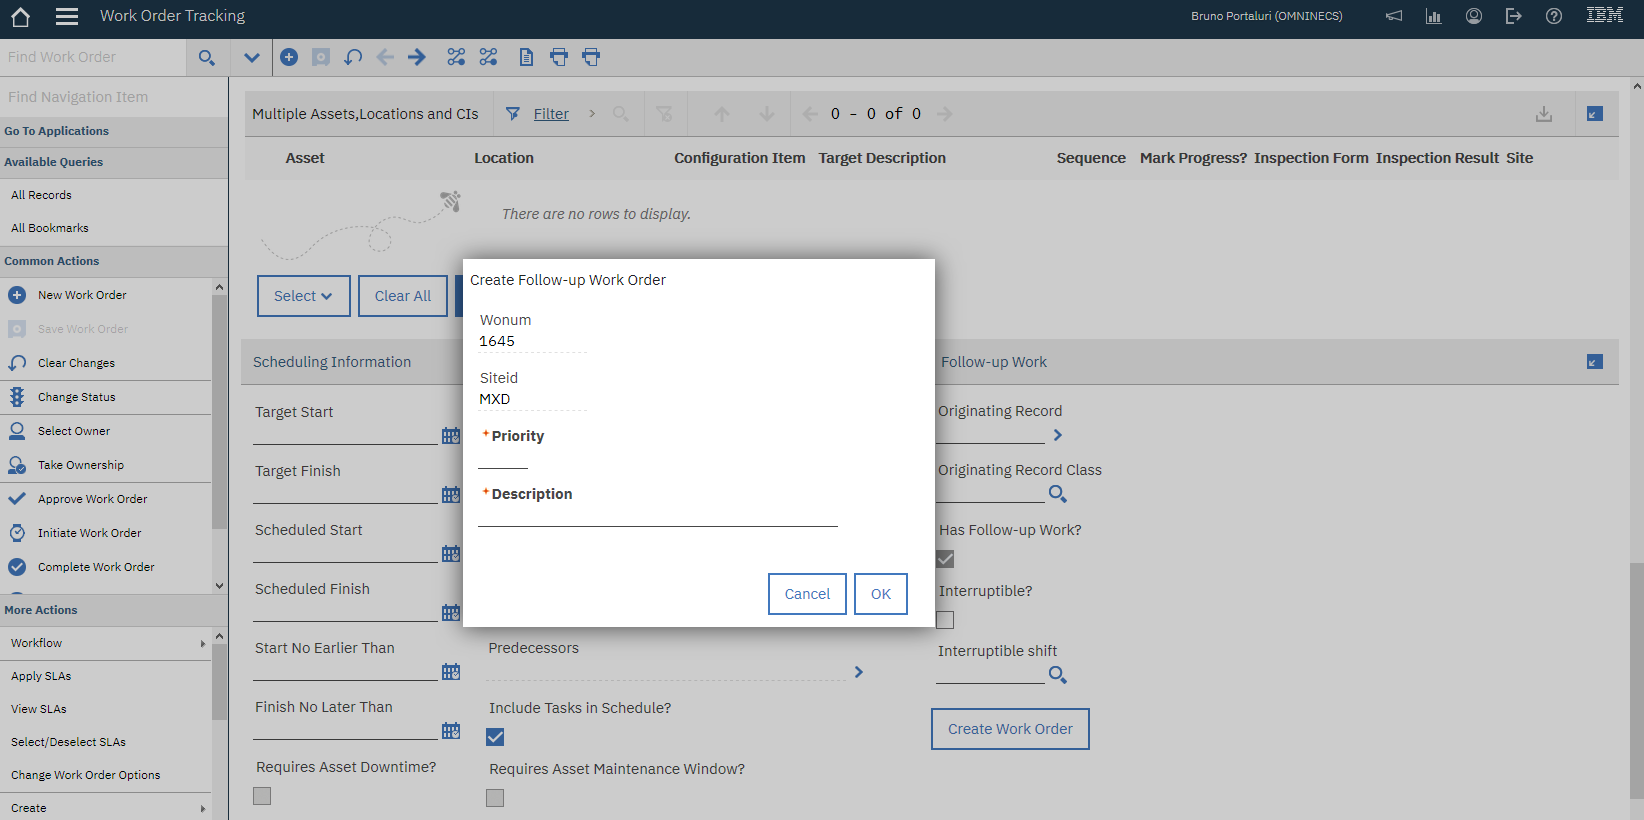
This dialog provides the following improvements to the standard behaviour.
- Prevents accidental creation of followup work orders because the user has the option of cancelling the action. The standard action creates and saves the record without asking for confirmation.
- Allows the user to enter important values that must be set on the new work order.
Configurations
Non-persistent Object
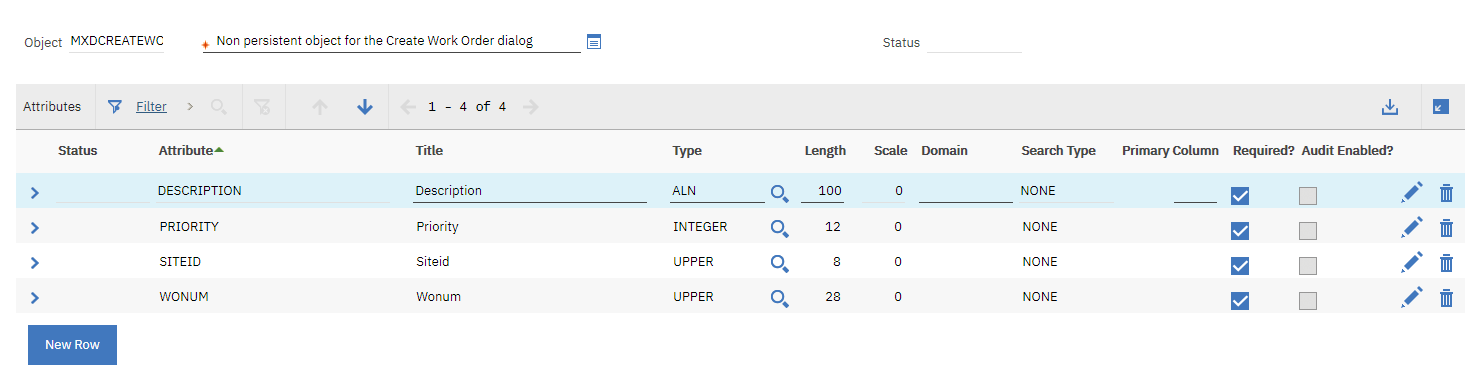
The custom dialog will be based on a non-persistent object so we first need to create it using the Database Configuration application.
- Object: MXDCREATEWO
- Description: Non persistent object for the Create Work Order dialog
- Persistent: False
- Attributes:
- WONUM – Same as: WORKORDER.WONUM – Required
- SITEID – Same as: SITE.SITEID – Required
- PRIORITY – Same as: WORKORDER.WOPRIORITY – Required
- DESCRIPTION – Same as: WORKORDER.DESCRIPTION – Required
Now open the WORKORDER object in the Database Configuration application and create the following relationship:
- Object: WORKORDER
- Relationship: MXDCREATEWO
- Child Object: MXDCREATEWO
- Where Clause: empty
Apply database configuration changes. It shouldn’t be necessary to activate the admin mode.
Application
Open Application Designer and download the WOTRACK application definition. Edit the XML file with a text editor to create button and dialog definitions as described hereafter.
The first snippet displays the ‘Create Work Order’ button in the Follow-up Work section. Paste the XML fragment in bold after the “Follow-up Work” section.
<section id="main_grid9" label="Follow-up Work">
  <textbox dataattribute="origrecordid" id="main_grid9_1" menutype="normal" rechover="wo_recordhover"/>
  ...
</section>
<buttongroup id="main_mxdwodialog_btngrp" align="left">
  <pushbutton id="main_mxdwodialog_btngrp_1" label="Create Work Order" mxevent="mxdwodialog"/>
</buttongroup>
Now scroll down to the end of the file and paste the dialog definition just before the ‘presentation’ end tag.
<dialog id="mxdwodialog" label="Create Follow-up Work Order" relationship="MXDCREATEWO">
   <section border="true" id="mxdwodialog_grid1">
     <sectionrow id="mxdwodialog_grid1_1">
       <sectioncol id="mxdwodialog_grid1_1_1">
         <section id="mxdwodialog_grid1_1_1_grid2">
           <textbox dataattribute="wonum" id="mxdwodialog_wonum" inputmode="readonly"/>
           <textbox dataattribute="siteid" id="mxdwodialog_siteid" inputmode="readonly"/>
           <textbox dataattribute="priority" id="mxdwodialog_priority"/>
           <textbox dataattribute="description" id="mxdwodialog_description"/>
         </section>
       </sectioncol>
     </sectionrow>
   </section>
   <buttongroup id="mxdwodialog_2">
     <pushbutton id="mxdwodialog_2_1" label="OK" mxevent="dialogok"/>
     <pushbutton id="mxdwodialog_2_2" label="Cancel" mxevent="dialogcancel"/>
   </buttongroup>
 </dialog>
Let’s now analyze those application configurations.
- The pushbutton is linked to the “mxdwodialog” event. By default Maximo will search for a dialog with this ID.
- The “mxdwodialog” uses the “MXDCREATEWO” relationship defined above to understand what is the base mbo of the dialog. This is the empty relationship defined above from the WORKORDER object to the non-persistent MXDCREATEWO object.
- The two buttons OK/Cancel use the standard Maximo events dialogok/dialogcancel. Both will close automatically the dialog but we will see that the dialogok event will trigger a save on the MXDCREATEWO object.
The user interface is already completed and working. Try it. If you push the “Create Work Order” button it should display the custom dialog. OK and Cancel buttons will perfectly work so we just have to hook the business logic using automation scripts.
Automation scripts
First of all we need to initialize the WONUM and SITEID fields of the MXDCREATEWO object when the dialog is displayed. We can define an automation script on the Initialize event of the MXDCREATEWO object to perform this logic.
Create the following automation script:
- Script with Object Launch Point
- Launch Point: MXDCREATEWODIALOGINIT – Initialize the Create Work Order dialog
- Object: MXDCREATEWO
- Event: Initialize
- Script language: python
#--------------------------------------------------------------------------
# Script: MXDCREATEWODIALOGINIT
# Launch Point: MXDCREATEWO - Initialize
# Initialize the Create Work Order dialog
---------------------------------------------------------------------------
from psdi.util.logging import MXLoggerFactory

logger = MXLoggerFactory.getLogger("maximo.script");
logger.info(">>> Entering script MXDCREATEWODIALOGINIT")

mbo.setValue("WONUM", mbo.getOwner().getString("WONUM"))
mbo.setValue("SITEID", mbo.getOwner().getString("SITEID"))
This scripts is quite straightforward. It first logs a row in the log and then sets the two fields on the current mbo (MXDCREATEWO) retrieving the value form the owner mbo (the WORKORDER). The mbo.getOwner() method is used for this purpose.
The tricky part is to detect the OK button press on the dialog. The secret hook here is the ‘save’ event. When the user’s press the OK button of the dialog, Maximo assumes that the mbo of the dialog must be saved. This means that we can execute a script using the Save event launch point.
Create the automation script as follows:
- Script with Object Launch Point
- Launch Point: MXDCREATEWODIALOGSAVE – Handles the Create Work Order dialog OK button
- Object: MXDCREATEWO
- Event: Save – Add – Before Save
- Script language: python
Script
#--------------------------------------------------------------------------
# Script: MXDCREATEWODIALOGSAVE
# Launch Point: MXDCREATEWO - Save - Add - Before Save
# Handles the Create Work Order dialog OK button
#--------------------------------------------------------------------------
from psdi.mbo import MboConstants
from psdi.util.logging import MXLoggerFactory

logger = MXLoggerFactory.getLogger("maximo.script")
logger.info(">>> Entering script MXDCREATEWODIALOGSAVE")

# to get the non persistent object of the dialog we need a small trick
mbo = mboset.getMbo(0)

# get the originationg work order MBO
origWo = mbo.getOwner()

# call the createWorkorder method to create a followup work order
newWo = origWo.createWorkorder(origWo.getThisMboSet(), None, False)

# set user-entered values in the new work order
newWo.setValue("WOPRIORITY", mbo.getString("PRIORITY"))
newWo.setValue("DESCRIPTION", mbo.getString("DESCRIPTION"))
Here are some consideration about the script above.
- The mbo implicit variable is not set. This is probably because the MXDCREATEWO object is non-persistent. The example shows that you can get it using the mboset.getMbo(0) method.
- Having the dialog’s mbo object we can get the owner mbo, the WORKORDER record using the classic mbo.getOwner() method.
- At this point we can use the owner mbo to perform any logic we need. In this case I’m calling the WO.createWorkorder method to create a followup work order and then I set some attributes values.
The described technique can be used for a wide variety of scenarios when you have to ask the user to enter some information and take some actions.
Hi Bruno ,
I am working on similar task , but in my case I need to call createWorkorder() method in such a way that I can have only single follow up work order created for multiple SRs selected on list tab of Service Request application.
How can I get list of selected records on list tab in automation script as list tab is handled via results bean.
Hi PB,
try to get the MBOSet and do a getSelection(). I have worked on a similar requirement where I need to get the selected values from the dialog and process those records through automation script as Bruno mentioned above. See if this works for you.
MboSet = mbo.getThisMboSet()
selectedRec = MboSet.getSelection();
This also should help: https://bportaluri.com/2021/10/maximo-bulk-update-list-view.html
Thanks very much for that, Bruno! Very, very useful.
Hi Bruno.
Can you apply the same approach and apply it to the list page of an app? For example, set a certain field (other then owner, status, other default options) for a group of records based on the current query (qbe). A simple example would we great.
Thx, ruud
Here is what you need: https://bportaluri.com/2021/10/maximo-bulk-update-list-view.html
Hi Bruno,
I’m working on a slightly different requirement where the dialog should display a list of records. I have used the same approach of non-persistent object and perform a set value . In my case the count() returns correct value however the dialog displays only 1 row especially the last row . Is there any way to overcome this ?
Hi – I used this to create MOCs from WOs and Incidents very effectively thank you! Also WOs from MOC.
However, I find that when I edit a text field in the dialog the Save button in the app gets enabled. As soon as I tab off the field it’s no longer enabled. If I press Ok whilst the Save button is enabled then I get the record as been updated by another user error.
Any suggestions on where I might look?
I seem to have resolved the issue – I changed the 3rd param on CreateWorkorder to True from False. Seems to have the desired effect.
Access the UI via an automation script (using WebClientSession):
https://community.ibm.com/community/user/communities/community-home/digestviewer/viewthread?GroupId=727&MessageKey=72fedf74-7167-42aa-af41-2e79b70dc7b7
Original post here:
Sending “dialogok” from Automationscript | get WebClientSession in Jython
https://www.ibm.com/developerworks/community/forums/html/topic?id=ab1c39d6-70c3-4d0e-b394-3ed4d34ecadb&permalinkReplyUuid=e1678737-8089-4f5c-8ea6-6045a53a9983
Hi Bruno,
I am working on something similar to this with a custom nonpersistent dialog box. The INIT autoscript fires as expected but the OK button script is being completely ignored. Is there anything you can suggest to find out why Maximo is ignoring the autoscript on the OK button?
Thanks,
~BC
Hello Bruno,
Your solution works fine on 7.6.1.1. However on 7.6.0.8, the clicking on Ok button of the dialog box does not do anything. It does not fire automation script save launch of NP object. Any clue
seems in 7.6.1.1 you can not create a relationship with a nonpersistent child via the GUI?
Hi Bruno,
I have a custom application where we used ASSET object. There is a requirement to populate dialog box in List tab. Once the dialog box is opened, User will give will Assetnum and the records should display in the Asset table format. We have tried with sigoption (Action launchpoint) for find button in dialog box. The Event(find button) is not triggering and not displaying any records. Can you please suggest. How can we achieve this requirement in dialog box. Is there any OOB dialog box where the records are displaying based on User inputs.
Thanks for your help.
How would you create a non-persistent table in the dialog box with multiple rows that is filled with an Initialization script?
Hi Bruno. Is it possible to present users with such a dialog while running a workflow?
E.g. you can easily have a condition in the workflow to validate the required data in a record. When the test fails (e.g. field x should not be blank), std WF behavior is to let the user return to the record and edit it. Then route the WF again. I prefer to show the user a (custom) dialog to enter the missing data interactively in the workflow. This would save a click of clicks and guide the user through the workflow without trial and error.
Do you believe it’s possible to implement this?
Thanks, ruud