After several experiments with IBM Watson IoT Platform I have decided to take a step back and play MQTT manually to really understand how it works. In this post I will walk through my experiments with of the Watson IoT Platform MQTT messaging API for devices, applications and gateways.
Prerequisites
First of all you need an account on IBM Watson IoT Platform on Bluemix. In all cases you need to create your own Internet of Things Platform service and create your own device type and device. I suggest you to follow the IoT Starter tutorial if you are on familiar with Watson IoT.
Another important preliminary step is to have an MQTT client to simulate MQTT calls. I have decided to use MQTT Spy tool. Download it from here and have it ready on your PC. There is a very good tutorial here if you want to learn more.
If you don’t like it you can also try MQTT Lens.
Publish event from a device
This is the most simple example. A device sending MQTT messages to the cloud.
The device must be first registered on Watson IoT Platform. On you IBM Bluemix dashboard, click on the Internet of Things Platform service. Open the dashboard by clicking on the ‘Launch Dashboard’ button.
Open the Devices page and click on the Create Device button. First create a Device Type and then a new Device with the following details:
- Type: TestDeviceType
- Name: TestDev1
- Security token: test1234
A summary page will be displayed with the device information needed for the connection.
Now we are ready to send our first message.
Devices use the following identification/authentication information (detailed documentation):
- Client ID in formatted as d:[OrgId]:[DeviceType]:[DeviceId]
- Username is use-token-auth
- Password is the authentication token generated during device registration
- Topic for publishing events is iot-2/evt/status/fmt/json
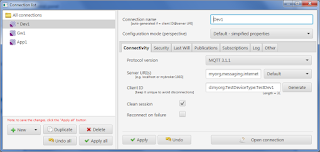
Create an new connection on MQTT Spy (replace [OrgId] with your Organization ID).
- Protocol version: MQTT 3.1.1
- Server URI: [OrgId].messaging.internetofthings.ibmcloud.com:1883
- Client ID: d:[OrgId]:TestDeviceType:TestDev1
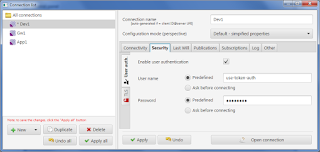
- Username: use-token-auth
- Password: test1234
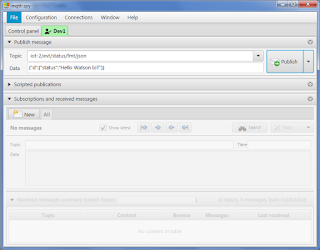
Now you can publish the first MQTT message.
- Topic: iot-2/evt/status/fmt/json
- Data: {“d”:{“status”:”Hello Watson IoT”}}
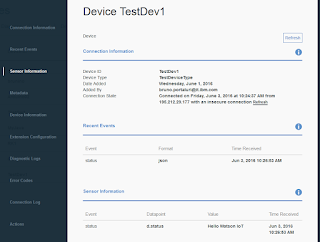
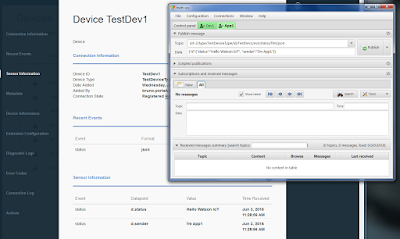
Now open the Watson IoT device details and click on the Publish button on MQTT Spy. You should see the incoming message like this.
Publish event from an application on behalf of the device
The Watson Iot Platform allow to define external applications that can publish events on behalf of any device and subscribe to device events. In this tutorial we will publish a message for the Dev1 device and subscribe to its events.
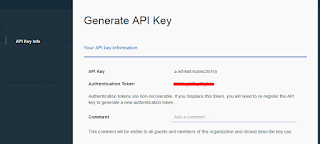
We first need to define the application on Watson Iot Platform Dashboard. Open the Access and API Keys tab, then click on Generate API Keys button. Take note of the API Key and Authentication Token.
Applications use the following identification/authentication information (detailed documentation):
- Client ID in formatted as d:[OrgId]:[AppId]
- Username id the API Key generated during registration
- Password is the Authentication Token generated during registration
An application can publish events as if they came from any registered device.
- Topic for publishing events is iot-2/type/[DeviceType]/id/[DeviceId]/evt/[EventId]/fmt/json
Create an new connection with your MQTT client.
- Protocol version: MQTT 3.1.1
- Server URI: [OrgId].messaging.internetofthings.ibmcloud.com:1883
- Client ID: a:[OrgId]:App1
- Username: enter your API Key
- Password: enter your Authentication Token
Now you can publish a message on behalf of device TestDev1 used before.
- Topic: iot-2/type/TestDeviceType/id/TestDev1/evt/status/fmt/json
- Data: {“d”:{“status”:”Hello Watson IoT”, “sender”:”I’m App1″}}
Subscribe to device events from an application
An application can subscribe to events from one or more devices using topic iot-2/type/[DeviceType]/id/[DeviceId]/evt/[EventId]/fmt/json
The MQTT wildcard character ‘+’ can be used to subscribe to more than one type of event.
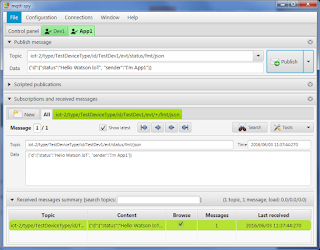
On MQTT Spy subscribe to all events from the TestDev1 device using topic iot-2/type/TestDeviceType/id/TestDev1/evt/+/fmt/json
Play with MQTT Spy and see how App 1 is notified when publishing events from the device. Try changing the subscription topic as well.
Gateway
Gateways can publish events from itself and on behalf of any device connected to it. In this tutorial we will publish a message for the Dev1 device and see how it is received from the subscribed app.
Open the Devices page on your Watson IoT dashboard and click on the Add Device button. First create a Gateway Type and then a new Gateway.
- Type: TestGwType
- Name: TestGw1
- Security token: test1234
Gateways use the following identification/authentication information (detailed documentation):
- Client ID in formatted as g:[OrgId]:[GwType]:[GwId]
- Username is use-token-auth
- Password is the authentication token generated during device registration
Note that these information are very similar to the device connection properties but the Client ID has now a ‘g’ prefix instead of ‘d’.
A gateway can publish events on behalf of a device.
- Topic for publishing events is iot-2/type/[DeviceType]/id/[DeviceId]/evt/[EventId]/fmt/json
Create an new connection with your MQTT client.
- Protocol version: MQTT 3.1.1
- Server URI: [OrgId].messaging.internetofthings.ibmcloud.com:1883
- Client ID: g:[OrgId]:TestGwType:TestGw1
- Username: use-token-auth
- Password: test1234
Publish an event for the gateway:
- Topic: iot-2/type/TestGwType/id/TestGw1/evt/status/fmt/json
- Data: {“d”:{“status”:”Hello Watson IoT”, “sender”:”I’m Gw1″}}
Publish an event for the device:
- Topic: iot-2/type/TestDeviceType/id/TestDev1/evt/status/fmt/json
- Data: {“d”:{“status”:”Hello Watson IoT”, “sender”:”I’m Gw1″}}
Note haw the App1 subscription is receiving the events from the device. You can also try to subscribe to the gateway’s events.
References
IBM Watson IoT Platform documentation
MQTT Spy tutorial

CMS for Web Development
Very Usefull information shared than other blogs
Thanks for Sharing and Keep updating…..
Great information provided. I really appreciate your writing. I like the way you put across your ideas. Awesome, keep it up.
Web Designing Company In Delhi
Hi Bruno I guess the IoT starter link is outdated. Can you please update the correct link?
For what application would a gateway be used?
hello,
and thanks for your sharing.
how would connect this to Maximo?