This entry is part of the Maximo Java Development series.
In this post I will describe all the steps needed to execute custom Java code upon the selection of an entry in the action menu or the click of a button in the toolbar.
Add a sigoption
First you need to create a new sigoption. Open the Application Designer and select the application you want to modify. Select ‘Add/Modify Signature Options’ and create a new signature RUNJAVA.
Add the menu entry
The second step is to create the custom entry in the action menu (or a new button).
Select ‘Add/Modify Select Action Menu’ and create the new entry RUNJAVA of type OPTION. Beware that the name must be the same as the sigoption.
Grant sigoption permissions and test the dummy action
Before going on I recommend the test that the new menu entry is visible.
Go in the Security Groups application, select the group you want to be able to see and execute the custom code. Go in the Applications tab and select your application. Now you should see the RUNJAVA sigoption on the bottom of the page. Click on the checkbox to grant access to the new menu entry.
Disconnect and login with a user belonging to the chosen group, go in the application and verify that you see the new menu entry.
Now it’s time to attach your Java code to it.
Write your Java code
The most suitable place to put your Java code is in the ‘App Bean Class’ which is the custom Java class that manages the application.
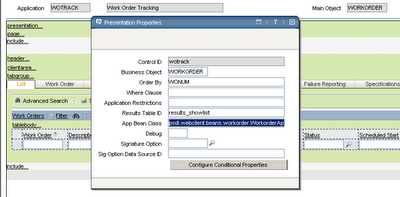
To determine which Java bean handles the application, open Application Designer and select the application, from the Action menu choose ‘Toggle Show All Controls’ and display the properties of the ‘presentation’ section. The ‘App Bean Class’ defines the Java class that you need to customize. Here is the WOTRACK application App Bean Class definition.
You should extend this class and create a new method with the same name of the sig option in the Java bean class (RUNJAVA in our example).
Don’t forget to change the App Bean Class property setting your own custom class.
Here is an example of how the custom class should look like.
package cust.psdi.webclient.beans.workorder;

public class CustWorkorderAppBean extends psdi.webclient.beans.workorder.WorkorderAppBean
{
  public int RUNJAVA() throws MXException, RemoteException
  {
    // put your custom code here
    return EVENT_HANDLED;
  }
}
Implement your custom logic in the RUNJAVA method and copy the class file under [SMPDIR]\maximo\applications\maximo\maximouiweb\webmodule\WEB-INF\classes folder. Rebuild and redeploy Maximo EAR file.


thanks you for the article.
Can You help me with other problem ?
Is there any possibility to execute custom class by typing this link
http://localhost/maximo/ui/maximo.jsp?event=loadapp&value=asset&uniqueid=114&additionalevent=xxxxxx
Can you please try to extend psdi.webclient.beans.asset.AssetAppBean (the ASSET app bean) as described in this post and call the xxxxxx method from the action menu?
You can put some traces to see if it works.
Then try invoking it with the link.
I think it should work.
Regards,
Bruno
thank you again, it's working now. I forgot to change class in application designer
Hi,
I followed all steps
and I now made the class 'CustWorkorderAppBean'
Where should I put this class to run it?
Thanks,
This article explains how to deploy custom classes: http://maximodev.blogspot.com/2012/05/maximo-extend-java-mbo.html
Hi Bruno,
Thank you very much.
It worked.
Your techincal posts are really good for us ..the maximo thecno consultants.
If possible can you share some Functional posts especially Work Management , Purchasing and Inventory with workflow …in terms business cases. It will really helpful for the community.
Hello,
I am a total beginner. And have a question. How and where can I make this class
Thank
hi Bruno,
is there a guide on how to call action(could be tied to an automation script) from a custom java class?
It should be noted that the custom methods in the custom AppBean class
MUST
be
ALL-CAPS
for your user to be able to execute the custom code on a click of a toolbar button or select action menu
This is because Maximo stores SIGOPT names in ALL-CAPS format, and it requires an identical-case-sensitive name of SIGOPT and AppBean.SIGOPT() for this to work
Besides the re-log procedure, one might need to restart the maximo application server as well for the changes to take effect.